Enter your email address to receive a one-time verification code.
🕐 ~15 min💾 Auto-saves
✉ Check your inbox
Enter Your Code
We sent a 6-digit code to . It expires in 10 minutes.
Expires in 10:00
✦ Select workshop
Which workshop?
You have more than one workshop registered to this email. Choose which one you're submitting for.
↩ Welcome back
Continue your draft?
We found a saved draft for your account.
Saved Draft
—
—
For Instructors
Production Guide
Everything you need to plan, record, edit, and deliver your Gnomon Workshop tutorial — from outline approval to final file upload.
Step 01
Workshop Outline
Before recording anything, a Workshop Outline must be provided to your Producer and approved by The Gnomon Workshop. Nothing moves forward without it.
What to include
1
Full descriptionA complete description of what you will be covering in your video workshop.
2
Estimated durationWorkshops must be a minimum of 2 hours and a maximum of 5 hours. Speak with your Producer if you expect yours to fall outside this range.
3
Software & plugins listA complete list of all software and any plugins that will be used.
4
Reference imagesA selection of images representing your intended final artwork. Consider how this will look as the workshop's cover image — will it entice subscribers to watch?
NOTE
Cover image mattersYour final artwork will be used on the tutorial page, press releases, social media, and all promotional materials. If you have multiple strong options, send them all.
Step 02
Test Recording
Once your outline is approved and an agreement has been signed by Alex Alvarez, the next step is a Test Recording for your Producer to review before you begin recording chapters.
TIP
Submit earlyWe highly recommend sending your Test Recording before your official start date. This gives us time to resolve any technical issues — low audio, spiked levels, background noise, or mismatched capture resolution — before your recording timeline begins.
What we check for
Audio levels are normalized — not too low, not spiked
No background noise or hiss
Final canvas is set to 1920×1080 in the Camtasia editor
Overall clarity and listenability
!
Chapters cannot begin until approvedYour test recording must be approved by your Producer before you record any workshop chapters.
Required software
All Gnomon Workshop instructors are required to use TechSmith Camtasia. Your Producer will supply a license. Do not use alternative screen-recording software without checking with your Producer first.
Step 03
Camtasia Recording Setup
The final output must be 1920×1080 Full HD at a minimum of 30 FPS. If you have a 4K or high-resolution monitor, follow the workflow below to record at a larger, more comfortable area and scale down in the editor.
Output specifications
Final Export Resolution
1920×1080
Set as your Camtasia canvas. Your recording area can be larger — see workflow below.
Minimum Frame Rate
30 FPS
Required for animation, video, or any fast-moving content.
Recommended workflow for 4K monitors
Recording at exactly 1920×1080 on a large monitor can make your UI look cramped and hard to read. Instead, record at a higher resolution and scale down in the editor — the final export stays at 1080p while your workspace is much more comfortable.
WorkflowRecord high, export 1080p — step by step
1
Set the Recorder to 2560×1440 (or 3840×2160)
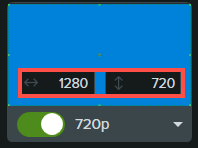
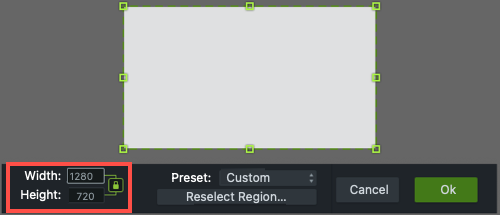
In the Camtasia Recorder, click the dropdown next to the recording area, select Custom, and enter 2560 × 1440. Position the capture box over the software you want to record.
Setting custom dimensions — Windows (left) and Mac (right)
If your software UI still looks too small, temporarily lower your display scaling to 150% or 200% in your Windows or Mac display settings before recording.
2
Toggle your inputs
Enable Screen Recording and Microphone. Optionally enable Camera and System Audio depending on your recording approach.
3
Select your microphone
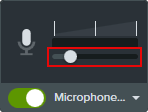
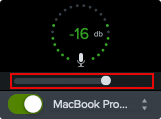
Use the dropdown to choose your mic. Adjust the audio level slider and do a quick test before you begin.
4
Start and stop recording
Click Start Recording, or use keyboard shortcuts:
Windows — Start/Pause: F9 Stop: F10
Mac — Pause: ⌘⇧2 Stop: ⌘⌥2
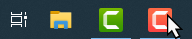
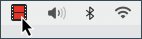
Stop via Windows taskbar (left) or Mac menu bar (right)
5
Set your Camtasia editing canvas to 1920×1080
Once your recording is in the editor, right-click the canvas preview window and select Project Settings. Set Canvas Dimensions to 1080p HD (1920×1080) and click Apply.
6
Scale the recording to fit the canvas
Your high-resolution recording will initially appear too large for the 1080p canvas. Select it on the timeline, open the Properties panel, and scale it down:
Recorded at 2560×1440
75%
Scale value in Properties panel
Recorded at 3840×2160
50%
Scale value in Properties panel
Because both resolutions share the same 16:9 aspect ratio as 1920×1080, the video scales down perfectly with no cropping or distortion.
Trimming and cutting
It's normal to record extra content at the start and end. Clean it up before delivering:
Trim — Drag the end of the clip inward to remove extra content. Drag it back to restore — your original media bin is untouched.
Cut — Drag the red or green playhead handle to select the area to remove, then click Cut. A stitched line marks where the cut was made. Double-click the playhead to rejoin.
Exporting your project
Send us Camtasia ZIP files, not rendered video. This lets us make final edits and saves you render time.
PC: File → Export → Zipped Project
Mac: File → Export → Project for Windows
When saving, always enable Create Standalone Project so all media and assets are bundled in the project file.
Quick tips
Do not include Title Cards or Chapter Numbers in the video — we may reorganize chapters after delivery.
Do not apply Speed Effects to Audio Channels — video tracks only.
Be mindful of 3D camera time-lapses. Moving cameras sped up too much can disorient viewers.
Submit one chapter at a time for review. Intros can be recorded last — starting with Chapter 2 is fine.
Step 04
Audio & Voiceover
Audio quality is non-negotiable. Poor audio is one of the most common reasons recordings are returned for re-recording.
Microphone positioning
Do not position the mic directly in front of your mouth — this picks up breath noise, mouth clicks, and causes level spikes. Keep it to the side. USB headsets with side-mounted microphones are our top recommendation. If using a desk stand, be aware that head movement can cause volume fluctuations. A breath guard is strongly recommended for stand mics.
Record narration live during screen captureTalk while recording your screen. You can pause playback at any time to catch up, or switch to Photoshop, Maya, etc. to demonstrate something in real time — then return to playback. This removes the pressure of keeping pace with what's on screen.
B
Record voiceover separately in CamtasiaPlay your silent screen recording back and use Camtasia's voiceover tool to narrate over it. Gives full control over pacing and delivery.
Time-lapsed sections
Any time-lapsed area must have a voiceover narrating what's happening. Silent gaps of any significant length will not be accepted. Do not use music as a replacement — informative narration is required throughout.
!
Edit before submittingCoughs, sneezes, "umms," "ahhs," unexpected background noises, and long pauses are not acceptable. Please edit them out before uploading — files returned for audio editing will delay your release date.
Step 05
Delivering Files
Your Producer will provide a private Dropbox link exclusive to you. Upload all files there — test recording, Camtasia project files, and all supporting assets. Do not send files by any other method.
Max File Size Per Upload
50 GB
Dropbox will terminate any upload exceeding this limit.
Chapter Delivery Cadence
Every 1–2 wks
First chapter due within 1–2 weeks of your recording start date.
Deadlines
The deadline on your instructor agreement is the date by which all workshop files must be delivered in full. Deliver the first chapter within 1–2 weeks of starting recording, then continue submitting chapters every 1–2 weeks. Early delivery lets us catch technical issues before they impact future chapters.
Chapter naming convention
Use the SKU naming convention provided in your template. Keep chapter names descriptive but concise. Use the same names as your Dropbox filenames.
✓ Preferred
ABC01_ch01_Introduction to Maya
ABC01_ch02_Hard Surface Modeling Techniques
ABC01_ch03_Final Compositing in Photoshop & Nuke
All of the following are required before your workshop can enter the release phase. Your Producer will provide the relevant links and templates for each item.
01
On-Camera IntroductionA 15–30 second on-camera introduction of you briefly describing the tutorial. This is mandatory for all instructors — recording to camera is required, not optional. The clip is used in your workshop trailer and helps the audience connect with the instructor behind the lessons.
TIP
Watch examples firstSteve Firchow, Kosuke Iwasaki, Alexander Lee, Adam Spring, and Neville Page all have strong introductions on the site — worth watching before you record.
ExampleSteve Firchow
ExampleNeville Page
ExampleKosuke Iwasaki
ExampleAdam Spring
↳
BackgroundFind a corner of your workspace that looks interesting — artwork, computers, or tools in the background work well.
↳
MicrophoneUse the same high-quality mic from your workshop recording if possible. A phone's built-in mic can work if you stay close enough, but avoid room reverb. We're happy to review a test recording if you're unsure.
↳
LightingA window during the day or a lamp is fine if you don't have studio lights. If shooting with a phone in low light, make sure lights are on — phone cameras get noisy in the dark. Most dedicated cameras handle low light well at a low f-stop.
!
We may ask you to re-recordif the composition, lighting, or audio quality isn't up to standard. Getting it right the first time saves everyone time.
02
Tutorial Description FormOnce recording is complete, complete the online Tutorial Description Form — you can open it from the tab at the top of this page. This must be filled out in full before your workshop can be released. It collects everything we need to publish and market your tutorial.
↳
Workshop infoProposed title (max 60 characters), subtitle (max 75 characters), skill level, total duration, and all software and plugins used.
↳
Workshop description250–400 words covering the key techniques taught, industry tips, what subscribers will learn, and a brief description of any downloadable project files.
↳
Target audience75–150 words describing who the workshop is aimed at and what prior knowledge they need.
↳
Learning outcomes6 to 10 bullet points (10–20 words each) describing what artists will be able to do after watching.
↳
Lesson breakdownA title (1–8 words) and description (50–60 words) for each lesson chapter.
↳
Project filesName and file size for each downloadable asset included with the tutorial.
↳
Instructor infoFull name, job title, company, website, social media handles (ArtStation, Instagram, X, LinkedIn, Cara, YouTube, Vimeo), a 60–180 word bio, and 1–3 peer quotes with name, job title, and company.
Ready to fill out your form?
Your progress saves automatically — the form uses your email to authenticate, so you can close it and pick up where you left off at any time.
03
Chapter NamesA complete list of descriptive chapter names using the correct SKU naming convention. Use these same names as your Dropbox upload filenames.
04
Final ArtworkAll final renders, images, playblasts, or animations at 1920×1080 Full HD. This becomes the cover image used across the tutorial page, newsletters, and social media. Multiple options are encouraged.
05
Project FilesAll project files accompanying the tutorial lessons, uploaded to your Dropbox link. For non-redistributable assets, reference their source in the tutorial or provide links in a downloadable PDF. Include as much as you are able to help viewers follow along.
06
HeadshotA color photo for your instructor page. The Gnomon Workshop may edit it for style and consistency with the site.
Payment
Option A
Royalties Plan
An advance is paid upon full release of your workshop, followed by ongoing royalties on a regular schedule. Refer to the Artist Royalty Payments PDF for full details.
$1,000 advance at release
Option B
One-Time Payment
Full payment is made to the account you specify upon full release of your workshop.
Full amount at release
Contact your Producer for the Artist Royalty Payments PDF for full payment details and schedules.
What happens after submission
Once your Tutorial Description Form is submitted and all files have been uploaded to Dropbox, the Head of Production reviews everything. If there are quality issues with the recordings, artwork, or written content, your Producer will reach out to discuss. If approved, your workshop enters the pre-release production phase — a copy editor works on the marketing copy using your description, and your Producer will provide an estimated release date.
Questions?
Contact your Producer
If you're unable to reach your assigned Producer, contact the Production Team directly.
Complete this form after finishing your tutorial recording. Your progress saves automatically.
Required fields marked
Logged in as:
SKU:
WorkshopDescriptionLessonsFilesInstructor
Draft name
Workshop Info
Maximum 60 characters with spaces
0/60
Maximum 75 characters with spaces
0/75
Who is the primary target audience?
Approximate total runtime (e.g. "4 hours 30 minutes")
Select all that apply, then list version numbers below.
Workshop Description
Minimum 250 words, maximum 400 words. Include:
A key statement about the workshop and target audience
Key skills/techniques taught, including tool/function names
Key industry tips/insights covered
What subscribers should expect to have learned
A brief description of any downloadable project files
0/400 words (min 250)
Audience & Outcomes
Describe who your workshop is aimed at, their experience level, and who will benefit most. Minimum 75 words, maximum 150 words. Counter turns yellow when under minimum, green when in range.
0/150 words (min 75)
Bullet-pointed list of what artists will learn. Minimum 6 points, maximum 10. Each point should be 10–20 words.
0/10 outcomes
· Need at least 6
Lesson Breakdown
Title (1–8 words) and description (50–60 words) for each lesson. Use the × button to remove a lesson.
0 lesson
Project Files
List each file by name and estimated size.
A sentence description for each file.
Instructor Info
As you want it published
Helps us refer to you correctly in descriptions and communications.
All optional.
ArtStation
Instagram
X (Twitter)
LinkedIn
Cara
YouTube
Vimeo
Minimum 60 words, maximum 180 words. Counter turns yellow when under minimum, green when in range.
0/180 words (min 60)
What other artists say about you — include their name, job title, and company.
✓
Submission Received!
Your tutorial description has been submitted successfully.
You'll receive a confirmation email at shortly.
⚠ Heads up: A submission with a similar title was found from your account. You can still submit — this is just a reminder to avoid duplicates.
✓ DRAFT SAVED
↩ Restore a Previous Save
Choose a snapshot to restore. Your current form data will be replaced.
⇄ Switch Workshop
Your current workshop's progress is saved first. Choose which workshop to work on next.